Introduction Unpacking the MICRO B II Quick Start Front Panel Layout Diagram Rear Panel Layout Diagram Set-Up Using The MICRO B II MIDI OMNI ON Mode Multi-timbral Mode Using More Than One Keyboard Simultaneously MIDI Controlled Effects Specifications Warranty
The MICRO B II was designed for both the purist B3 organ player or people who just need a great organ sound. The MICRO B II is real easy to use. It requires absolutely no programming. There are front panel rotary controls for volume,overdrive, keyclick and percussion volume. It has a built-in rotating speaker effect (front panel and foot switch controlled) with simulated upper and lower rotors which speed-up and slow-down just like the real thing.
The MICRO B II lets you select three levels of chorus or vibrato which can be used in conjunction with the rotating speaker effect and comes with 36 of the most popular drawbar settings. The first 22 presets are selectable via the front panel: all 36 can be selected through MIDI. In addition, the MICRO B II can operate in three part multi-timbral mode for any three adjacent channels as well as MIDI OMNI ON mode. There are high level stereo audio outputs, CH2 output may be used to drive stereo headphones. All this makes the MICRO B II very easy and intuitive to use.
Inside the MICRO B II you will find:
Please return the warranty card soon after your purchase. The information you provide will allow Voce to keep you informed about updates and new products.
I want to...

There are a total of 36 presets in the MICRO B II. The first 22 are selected through the PRESET selector, the remaining 14 presets may be selected via program changes from a MIDI controller.

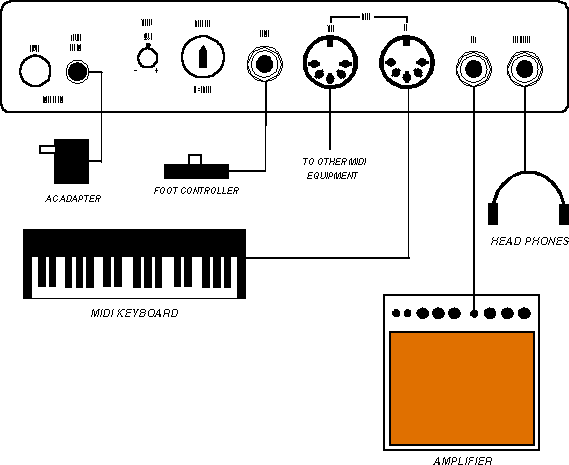
To use your MICRO B II, please follow these easy steps:
The MICRO B II requires a MIDI input from a MIDI device such as a MIDI keyboard, digital piano, or computer in order for it to be played.
The MICRO B II provides two audio outputs for a stereo rotating speaker effect. Both CH1 and CH2 outputs should be connected for stereo operation to suitable audio system (i.e. digital piano audio inputs, stereo mixer / sound system line level inputs). If mono audio operation is desired, connect the instrument amplifier (mixer etc.) to CH1.
A set of stereo headphones may be connected to the CH2 output. Depending on the type of headphones used, it may be necessary to raise the level of the front panel volume control.
Useful in connecting more than one MIDI module in a daisy chain configuration. Use this output for sending a "carbon copy" of the MIDI data appearing at the MIDI IN connector to other MIDI devices.
A momentary foot pedal (such as a sustain pedal) may be connected to this input to toggle the rotating speaker effect between a fast or slow state. The front panel FAST LED indicator will toggle on or off when the foot switch is operated.
The MICRO B II requires an external AC adapter. Make sure that you first connect the small barrel connector on the rear panel of the MICRO B II before connecting the AC adapter to the wall outlet.
Set the basic MIDI channel on the MIDI channel selector located on the rear panel of the MICRO B II. The basic MIDI channel should be the same as the channel that your MIDI controller uses to transmit MIDI note on/note off and program change information to the MICRO B II. Refer to the MIDI channel selection table on page 12 for a list of all valid MIDI channel combinations.
A rotary control is provided in the event that it is necessary to change the tuning of the MICRO B II. The center detent position is A440 standard tuning. The pitch may be raised or lowered by one semitone.
A built-in demonstration sequencer will demonstrate some of the various sounds and effects the MICRO B II is capable of performing. It may be activated by holding in the fast button and simultaneously turning the preset selector to the M position. Here is a summary of the demonstration:
Some of the units controls remain active during the demonstration. They are VOLUME, OVERDRIVE, KEY CLICK volume, and PERCUSSION VOLUME . To exit the demonstration mode, turn the preset selector to another position.
Our thanks to John Gatti for all the time and effort he put into creating this demo. If only we had one hour playing time instead of just two minutes.
After hooking up the MICRO B II as explained in the Set-Up section, you will be ready to begin playing. The MICRO B II was designed to be very easy and intuitive to use. The following is a brief description of the MICRO B II's controls together with an explanation of their usage.
Here is a list of all 36 MICRO B II presets and their tone-wheel organ equivalents:
| Preset # | Drawbar equivalent | Preset # | Drawbar equivalent |
| 1 | 888000000 | 19 | 888220000 |
| 2 | 808808008 | 20 | 888000000 split / (505000000 +2 oct.) below middle C |
| 3 | 888888888 | 21 | 888000000 split / 848000000 below middle C |
| 4 | 888473256 | 22 | 888000008 split / 848000000 below middle C |
| 5 | 832000003 | 23 | 848000000 |
| 6 | 800800008 | 24 | 878420000 |
| 7 | 888000008 | 25 | 888070340 |
| 8 | 888800000 | 26 | 808104000 |
| 9 | 800800000 | 27 | 887340060 |
| 10 | 800000005 | 28 | 864321110 |
| 11 | 880070080 | 29 | 800370000 |
| 12 | 800000544 | 30 | 880000000 |
| 13 | 088800002 | 31 | 888800008 |
| 14 | 888800003 | 32 | 800008678 |
| 15 | 008703004 | 33 | 505000000 |
| 16 | 888000030 | 34 | 888000000 split / 848000000 +3 oct.) below middle C |
| 17 | 828030001 | 35 | Farfisa Compact |
| 18 | 831000025 | 36 | Vox Continental |
Notice that split presets are provided to make better use of single manual operation. Split presets 21 and 22 provide a typical organ bass setting for the left hand, while presets 20 and 34 provide a suitable sound for left hand accompaniment. The percussion effect will only be triggered for the right-hand part of the split.
Two "combo" organ settings (35, 36) are provided: their sound is very different than the tone-wheel organ settings.
Here is a list of Effects settings:
| Position | Description |
| OFF | NO EFFECTS ENABLED |
| R1 | Rotating speaker effect model 122 * |
| R2 | Rotating speaker effect model 22 * |
| C3R2 | Chorus depth 3 and RS model 22 * |
| C1R | Chorus depth 1 and RS model 122 * |
| C2R | Chorus depth 2 and RS model 122 * |
| C3R | Chorus depth 3 and RS model 122 * |
| V1R | Vibrato depth 1 and RS model 122 * |
| V2R | Vibrato depth 2 and RS model 122 * |
| V3R | Vibrato depth 3 and RS model 122 * |
| V1 | Vibrato depth 1 |
| V2 | Vibrato depth 2 |
| V3 | Vibrato depth 3 |
| C1 | Chorus depth 1 |
| C2 | Chorus depth 2 |
| C3 | Chorus depth 3 |
Note that for the model 22 rotating speaker simulation the rotors decelerate to a complete stop while for the model 122 simulation the rotors decelerate to a slow rotation rather than stopping entirely.
Both rotating speaker effects employ "cabinet simulation" which simulates the sound which would be picked up from microphones placed in front of a speaker cabinet. You'll notice a change in timbre and distortion characteristics when the rotating speaker effect is enabled.
When the MICRO B II is in MIDI OMNI ON mode, it will respond to all MIDI channels. Any NOTE ON/NOTE OFF information (within the note range utilized by the MICRO B II) and program changes (if the PRESET selector is set to P or M) will be recognized by the MICRO B II.
To enable MIDI OMNI ON mode set the MIDI Channel (MIDI CHN) selector on the rear panel to the 0 position.
Multi-timbral Mode allows the MICRO B II to accept MIDI information received on three (3) adjacent channels as determined by the basic channel selected on the rear panel MIDI channel selector. Program changes may be sent to the MICRO B II to allow different presets to play on each of the three channels. The percussion effect will only be triggered by notes played on the basic MIDI channel. Overall MIDI volume will only be set by MIDI control number 7 sent on the basic MIDI channel. MIDI control number 7 sent on either of the two other channels will set the volume balance between the channel they are sent on and the basic MIDI channel.
To use Multi-timbral mode do the following:
1. Select the three adjacent channels to be enabled by first setting the MIDI channel selector to the basic MIDI channel. The basic MIDI channel and the next two higher channels will be enabled. If channel 15 is selected, channels 16 and 1 will also be enabled. See the chart on the next page.
2. Set the preset selector on the front panel to M. By doing this you are now telling the MICRO B II to accept MIDI data on the three channels selected in step 1 above.
OMNI ON mode and Multi-timbral mode are mutually exclusive. OMNI ON mode takes precedence over Multi-timbral mode.
| Switch Position | Basic MIDI Channel | Multi-Timbral Channels |
| 0 | OMNI ON | N/A |
| 1 | 1 | 1, 2, 3 |
| 2 | 2 | 2, 3, 4 |
| 3 | 3 | 3, 4, 5 |
| 4 | 4 | 4, 5, 6 |
| 5 | 5 | 5, 6, 7 |
| 6 | 6 | 6, 7, 8 |
| 7 | 7 | 7, 8, 9 |
| 8 | 8 | 8, 9, 10 |
| 9 | 9 | 9, 10, 11 |
| 10 | 10 | 10, 11, 12 |
| 11 | 11 | 11, 12, 13 |
| 12 | 12 | 12, 13, 14 |
| 13 | 13 | 13, 14, 15 |
| 14 | 14 | 14, 15, 16 |
| 15 | 15 | 15, 16, 1 |
If you wish to setup the MICRO B II in a way which simulates a console organ, you'll need a couple of keyboards and a set of MIDI bass pedals. In order to connect these three MIDI devices to the MICRO B II you'll need a device called a MIDI merger. This device squeezes more than one MIDI data stream into a single MIDI output. Connect the keyboards' and bass pedal's MIDI outputs to the MIDI inputs of the merger. Connect the merger output to the MICRO B II. Note that connecting more than one MIDI output together with a "Y" cable will NOT work! Set each keyboard and bass pedal unit to consecutive MIDI channels. Follow the previous instructions for placing the MICRO B II in multi-timbral mode. You'll probably want to set the right hand manual to the basic MIDI channel. That will allow the percussion to be triggered by your right hand. The accompaniment (left hand) keyboard's volume can be adjusted with respect to the other manuals if it can send MIDI volume.
The MICRO B II allows control of several of its effects via MIDI control changes. The following table lists the effects that can be controlled by MIDI, their MIDI control numbers, and the associated control values:
| Effect | MIDI Control # | Value |
| Volume | 7 | 0 = softest, 127 = loudest |
| Rotating Speaker Fast/Slow | 68 | 0 - 63 = Slow, 64+ = Fast |
| Rotating Speaker On/Off | 92 | 0 - 63 = Off, 64+ = On |
| Percussion On/Off | 73 | 0 - 63 = Off, 64+ = On |
| Percussion Harmonic | 72 | 0 - 63 = 2nd, 64+ = 3rd |
| Percussion Decay | 70 | 0 - 63 = slow, 64+ = fast |
| Percussion Volume | 71 | 0 = softest 127 = loudest |
| Key Click Volume | 89 | 0 = softest 127 = loudest |
| Vibrato/Chorus On/Off | 95 | 0 - 63 = Off, 64+ = On |
| Vibrato/Chorus Depth | 93 | 0 - 18 = V1, 19 - 36 = V2, 37 - 58 = V3, 59 - 79 = C1, 80 - 100 = C2, 101 - 127 = C3, |
| Rotating Speaker Fast Speed | 88 | 0 = slowest, 127 = fastest |
| Rotating Speaker Acceleration Time | 87 | 0 = longest, 127 = shortest |
Note the MIDI control numbers are fixed, therefore to control the effects mentioned in the table you will need a programmable MIDI controller. The various buttons, wheels, sliders, or pedals of your MIDI controller must be assigned to the control number corresponding to the effect you wish to control.
Because of the wide variety of MIDI controllers (keyboards, computers, or sequencers) available on the market today, you will have to determine which MIDI controller is appropriate for this particular application. For example, you may elect to use the MOD wheel on your MIDI keyboard to control the rotating speaker FAST/SLOW rate or you may decide to use one of the push button controls on your MIDI controller to select the PERC 2nd or 3rd harmonic. Examples:
Program the MIDI keyboard's MOD wheel to send data on MIDI control number 68 instead of control number 1. Since the MOD wheel is a continuous controller, it will output a control value of 0 through 127 depending on what position it is set to. To select the rotating speaker FAST rate simply flip the MOD wheel all the way up (on most keyboards up means away from you) or all the way down (towards you) for the SLOW rate. The rotating speaker will begin changing speed after the MOD wheel crosses the midway point (when the control value switches between 63 and 64).
Let's say your MIDI controller has a push button control that can be assigned any MIDI control number. Set the MIDI control number of the push button control to 72. The MICRO B II will interpret MIDI control number 72 as the Percussion 2nd/3rd control. Most push button MIDI controllers will output a value of 127 when in the "on" position and a value of 0 when in the "off" position. If your MIDI controller allows you to program the control value, then make sure you set it to a value between 0 through 63 for "off" and 64 through 127 for "on". Now you should be able to select the PERC2nd or 3rd harmonic by pressing the push button.
Determine which controller you'd like to use to set the rotating speaker effects fast speed. Let's use the MOD wheel for this example. Program the MIDI keyboard's MOD wheel to send data on MIDI control number 90 instead of control number 1. Since the MOD wheel is a continuous
controller, it will output a control value of 0 through 127 depending on what position it is set to. Set the MICRO B II to one of the Rotating Speaker effects. Set the MICRO B II's ROTOR speed button to fast (LED on). You'll notice now that the rotor speed will track the position of the MOD wheel. Rotating the MOD wheel away from you will set the rotor speed quite high, moving it closer to you will set the speed to a slow rate. This function is handy for customizing the rotating speaker effect to suit your taste. It also allows for real-time control of the rotor speeds which can be used in place of the built-in acceleration / deceleration function.