Introduction Unpacking the V5 Control Layout Diagram Rear Panel Front Panel What Are Drawbars? Historical Organ Information Setting The MIDI Channel Using Presets and Live Mode Saving Presets Setting Splits On The V5 Using the V5 With A Sequencer Hidden V5 Functions MIDI and System Exclusive Information Specifications Warranty
The V5 is a compact organ module which can be played from any MIDI keyboard or sequencer. It can be velcroed onto a keyboard controller allowing for an ergonomic placement of controls. The V5 supports up to two 61 note MIDI keyboards and 25 note MIDI pedalboards. The V5 uses an organ generator architecture and is fully polyphonic for both manuals and pedals simultaneously.
Inside the V5 carton you will find the following:
Please return the warranty card soon after your purchase. This card will allow Tonewheel LLC to keep you informed of updates and new products.
The V5 rear-panel contains mostly connectors. Refer to the diagram on page 2. The labels for the rear-panel connectors and switches are on the top face plate. You'll find the following on the rear-panel:
The V5 contains controls on its top and front panels which will be very familiar to the tonewheel organist. We‘ examine these controls one group at a time. The first set are the four (4) knobs located on top.
The first of these is VOLUME. This knob does not send MIDI volume: It just sets the output level of the V5. The next knob of interest is the OVERDRIVE knob. It is used to create a distortion effect popular in rock music. This knob also sends a MIDI control message. The overdrive function is also MIDI controllable.
The third knob is KEYCLICK level. Key click is the extra noise which occurs on the attack of a note played on a tone wheel organ. It‘s adjustable on the V5. This knob also sends a MIDI control message and key click level is MIDI controllable function.
The last knob on the V5‘s top panel is LEAKAGE. The sound of leakage is like many notes sounding at once at a much softer volume behind the desired tone. This is caused by the close proximity of many wires which carry the organ tones in a tone wheel organ and is sometimes desirable for ballads. The LEAKAGE knob also sends a MIDI control message and leakage level is MIDI controllable function.
There are four (4) percussion buttons located on the V5. They are PERCUSSION ON/OFF, PERCUSSION NORM/SOFT, PERCUSSION SLOW/FAST, and PERCUSSION 2nd/3rd. Percussion in a tone wheel organ is tone generated on the attack of notes played on the upper keyboard only. The original intent of this function was to allow a tone wheel organ to produce xylophone type tones.
All of the percussion buttons both transmit MIDI control changes and respond to MIDI control changes. The first button, PERCUSSION ON/OFF, is self explanatory. The second button, PERCUSSION NORM/SOFT, selects from two (2) different initial volumes for the Percussion effect. The PERCUSSION SLOW/FAST button selects from two (2) different rates of decay. The last button, PERCUSSION 2nd/3rd, selects the harmonic to be used for the percussion tone. "2nd" corresponds to the 4‘ drawbar tone while "3rd" corresponds to the 2-2/3‘ drawbar.
Another feature of tone wheel organs is Vibrato/Chorus. Note the two are mutual exclusive basically chorus is the vibrato effect and the original sound mixed together. There are two (2) buttons for Vibrato/Chorus selection both transmit MIDI control changes and respond to MIDI control changes. The first is VIBRATO/CHORUS ON/OFF. This enables the effect. The second, VIBRATO/CHORUS SEL, selects the depth of the effect and whether it is chorus or vibrato. Pressing this button advances the indicators which display level (V1, V2, or V3) and whether chorus is selected.
Last but not least are the drawbars themselves. If you are not familiar with their function please read the section "What Are Drawbars?". The V5 has nine (9) drawbars which constitute a set for the tone wheel organ. The drawbars transmit MIDI control changes when they are moved. The V5 also responds to these control changes. The V5 actually will respond to an additional set of drawbars which may be sent via MIDI control changes. These allow a player to morph (change gradually) back and forth between the drawbars (or preset setting) on the V5 and an external set of virtual drawbars. This is accomplished by moving the Modulation Wheel on the MIDI controller. Upon power-up the V5 defaults to its second set of drawbars being pulled all the way out (full). This is the case until other MIDI control changes are received for the secondary (auxiliary) drawbars. See the MIDI and System Exclusive section for more on this.
This section will describe the use of drawbars. The V5 has a set of nine (9) drawbars.
Tone-wheel organs use drawbars in a way which is analogous to the faders of a graphic equalizer. While a graphic equalizer modifies the timbre of a sound, drawbar synthesis creates timbres. This is actually a form of additive synthesis. Harmonic levels are increased by pulling drawbars out and decreased by pushing them in. As with a graphic equalizer, drawbars are also arranged with ascending frequencies from left to right. The 2nd drawbar from the left is an exception to this arrangement rule (see the Historical Organ Information section).
For example, if the leftmost drawbar is the only drawbar pulled out, the sound produced will be a low-frequency sine wave. A sine wave has no harmonic overtones. This makes sense; there is no other drawbar pulled out.
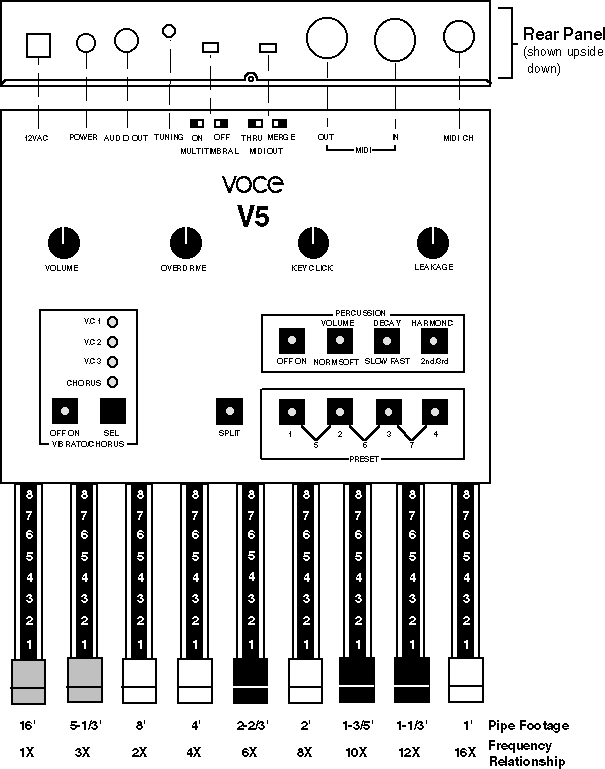
Organ registration conventions developed over many centuries. Referring to the drawbar diagram on page 2, you will notice pipe footages associated with the drawbars. This notation is a throw-back to the days of pipe organs.
Pipe organs produce sound by introducing noise (turbulent air) into tuned resonators (pipes). An organ flute pipe sounds like a flute and is the most pure sounding (free of harmonics) type of organ pipe. This is the type of sound produced by playing a note on a tone-wheel organ with a single drawbar pulled out.
A flute pipe's frequency is roughly dependent on its length. The longer the pipe, the lower its frequency. Notice that the footages decrease for drawbars going from left to right. This agrees with the graphic equalizer analogy: The frequencies get higher going from left to right. If the pipe footages for the drawbars are divided into the first drawbar footage (16'), the relationship between the drawbar's harmonic frequencies can be seen. This relationship is shown in the diagram on page 2 below the footages.
Notice that the white drawbars have harmonic frequency relationships which are powers of two (2, 4, 8, and 16). This type of harmonic relationship is one in which the tones are related by octaves. The octave relationship is considered to be a "pure" relationship and that is why the white color is used to denote these drawbars. Drawbar harmonics which are not an octave apart from the white drawbars are indicated by their black-colored handles.
Many people wonder why the first drawbar (16') is not white and why the second drawbar appears to violate the low to high harmonic arrangement. Traditionally the 8' stop (drawbar) is thought of as the fundamental tone, therefore all harmonic frequencies below the fundamental tone or less than an octave above the fundamental are known as sub-harmonics. These subharmonic drawbars are designated by a brown-colored handle.
There are some aspects of the sound of the tonewheel organ which some people may consider to be defects. One of these is key click. Key click is the noisy sound produced on the attack of the organ notes. Key click was the inadvertent byproduct of the electrical noise caused by the mechanical switch contacts of a key. Engineers tried for many years to eliminate this "problem" only to find that many people liked the sound. The V5 is capable of producing this sound by adjusting the knob provided for this function.
Another so called defect is generator leakage. This is caused by the close proximity of many wires which carry the organ tones. The sound of leakage is like many notes sounding at once at a much softer volume behind the desired tone.
Distortion, once thought to be undesirable in the sound of an organ is quite useful for producing rich overtones. Originally it was produced by overdriving the tube amplifier used to amplify the organ‘s sound. Distortion is controlled on the V5 by the knob labeled "Overdrive".
The V5 may be operated in three (3) different MIDI modes: The first is Omni On — the V5 responds to all 16 MIDI channels. To use this mode set the MIDI selector knob on the rear panel to "0" position.
The second mode of MIDI operation is the normal single channel mode in which the V5 responds to only one (1) MIDI channel. The MIDI channel for this mode is set using the MIDI selector knob on the rear panel. MIDI channels 1 - 15 may be set this way by turning the rear panel MIDI selector knob to the desired channel number making sure the Multitimbral switch is set to the off position. Please note that you cannot access channel 16 in this mode.
The third mode of MIDI operation for the V5 is multitimbral mode. The V5 will respond to three (3) consecutive MIDI channels in this mode allowing three (3) manual organ operation. The upper organ manual will be the first of the three (3) consecutive channels. The lower organ manual will be the middle channel of the three (3) consecutive channels: and the pedal channel will be the last of the three (3) consecutive channels. To use this mode set the Multitimbral switch to the on position and set the MIDI selector switch to the first channel of operation. Do not set the MIDI selector switch to the "0" position since Omni Mode supercedes multitimbral mode.
For example, if the V5‘s channel selector is set to 15 and the multitimbral mode switch is on, the V5 will respond to channel 15 as the upper manual, 16 for the lower manual, and channel 1 for the pedals.
The V5 can save all of its settings to a preset. There are seven (7) normal presets on the V5 and one special non-preset or Live Mode which can be selected from the preset buttons. Presets 1 - 4 are accessed by pressing buttons 1 - 4. Presets 5 - 7 are accessed by combinations of the preset buttons. When preset buttons 1 and 2 are pressed simultaneously, preset 5 is accessed. When preset buttons 2 and 3 are pressed simultaneously, preset 6 is accessed. When preset buttons 3 and 4 are pressed simultaneously, preset 7 is accessed.
To jump to the live mode settings which are the current settings of all the knobs and drawbars, press the preset button(s) which are currently illuminated. All button indicators will be extinguished indicating you are in Live Mode.
It‘s very easy to save presets on the V5. Once a desired drawbar setting has been obtained along with other settings like Overdrive level, Percussion On/Off merely hold down the desire preset number button(s) until all the preset indicators light indicating the preset has been saved. This procedure is similar to saving channels on some car radios. Note that there are seven (7) presets available on the V5 using four (4) buttons. Presets 1 - 4 are accessed by pressing buttons 1 - 4. Presets 5 - 7 are accessed by combinations of the preset buttons. When preset buttons 1 and 2 are pressed simultaneously, preset 5 is accessed. When preset buttons 2 and 3 are pressed simultaneously, preset 6 is accessed. When preset buttons 3 and 4 are pressed simultaneously, preset 7 is accessed. The state of all the controls of the V5 is saved to its presets including Split mode information.
The V5 allows the player to set one (1) split for single manual operation. To turn on the split merely press the SPLIT button. The button will light indicating that split mode is active and the V5 will play the normal drawbar setting for the right hand side of the keyboard and a different setting below the split point.
Both the split point and left-hand preset are programmable. To change the split point and left-hand preset, hold the SPLIT button down until its indicator starts flashing. You are now in split program mode. Any note you press on the MIDI controller while in this mode will be interpreted as the new split point. Any preset button(s) which are pressed while in program mode are interpreted as the new left-hand preset sound. It is advisable to prepare a left-hand preset prior to entering this mode. To do so, pick another preset to overwrite. It must be different than the one using the split. Save a new drawbar configuration by holding down the selected preset button(s) until all the preset buttons light to indicate the settings have been saved.
All of the split information as well as the drawbar, knob, and button setting are saved when a preset is saved. See the section on "Saving Presets" for more information.
The V5 has a convenient feature to allow the recording of a performance using a MIDI sequencer. The V5 will merge all MIDI control changes which it creates by setting the MIDI Out switch to the MERGE position. In this mode, the MIDI output will contain all of the keyboard‘s MIDI information sent to the V5 as well as any changes to the V5‘s drawbars, knobs or buttons. This includes both MIDI control and program changes generated by the MIDI keyboard and the V5.
To play back a MIDI sequence, connect the MIDI out of the sequencer directly to the V5. Any V5 button, drawbar, or knob changes as well as keyboard information which was recorded by the sequencer will be recognized by the V5 upon playback.
There are no dedicated buttons for two (2) "hidden" functions which the V5 can perform. These are infrequently used functions which are probably not done in a performance setting. The first will reset the V5 to its factory settings. To do this: power off the V5 unit, hold down the Percussion On/Off and 2nd/3rd Harmonic buttons simultaneously while turning on the unit‘s power. The factory presets are now rewritten.
The second is to send a System Exclusive MIDI dump of the V5‘s preset memory. This is only necessary if the computer / sequencer requesting the data cannot send a request command. See the MIDI and System Exclusive Info section about this. To perform the System Exclusive dump: power off the V5 unit, hold down the Split button while turning on the unit‘s power. The V5 will immediately send the System Exclusive dump.
The V5 will respond up to three (3) consecutive MIDI channels which can be thought of as two (2) organ manuals and a bass pedal manual. See the chapter on "Setting The MIDI Channel". Both the upper and lower manuals respond to MIDI note on and note off commands for notes C1 through and including C6 while the bass pedal manual responds to notes C0 through and including C2.
The various buttons and knobs on the top face of the V5 also send and respond to MIDI. Here is a table of all the MIDI control numbers used by the V5:
| MIDI Control # | Function | Sent | Recognized |
| 1 | Morph | No | Yes |
| 7 | Volume | No | Yes |
| 12 | Drawbar #1 (MAIN) | Yes | Yes |
| 13 | Drawbar #2 (MAIN) | Yes | Yes |
| 14 | Drawbar #3 (MAIN) | Yes | Yes |
| 15 | Drawbar #4 (MAIN) | Yes | Yes |
| 16 | Drawbar #5 (MAIN) | Yes | Yes |
| 17 | Drawbar #6 (MAIN) | Yes | Yes |
| 18 | Drawbar #7 (MAIN) | Yes | Yes |
| 19 | Drawbar #8 (MAIN) | Yes | Yes |
| 20 | Drawbar #9 (MAIN) | Yes | Yes |
| 21 | Drawbar #1 (AUX) | No | Yes |
| 22 | Drawbar #2 (AUX) | No | Yes |
| 23 | Drawbar #3 (AUX) | No | Yes |
| 24 | Drawbar #4 (AUX) | No | Yes |
| No | Drawbar #5 (AUX) | No | Yes |
| 26 | Drawbar #6 (AUX) | No | Yes |
| 27 | Drawbar #7 (AUX) | No | Yes |
| 28 | Drawbar #8 (AUX) | No | Yes |
| 29 | Drawbar #9 (AUX) | No | Yes |
| 64 | Sustain / Hold | No | Yes |
| 70 | Percussion Decay | Yes | Yes |
| 71 | Percussion Volume | Yes | Yes |
| 72 | Percussion Harmonic | Yes | Yes |
| 73 | Percussion On/Off | Yes | Yes |
| 89 | Key Click Volume | Yes | Yes |
| 90 | Leakage | Yes | Yes |
| 91 | Distortion | Yes | Yes |
| 93 | Vibrato/Chorus Depth (see table below) | Yes | Yes |
| 95 | Vibrato/Chorus On/Off | Yes | Yes |
| 102 | Save Function | Yes | Yes |
Vibrato/Chorus Depth
| MIDI Data Value | Function |
| 18 | Vibrato Mode, level 1 (C / V 1 Lit, CHORUS Off) |
| 36 | Vibrato Mode, level 2 (C / V 2 Lit, CHORUS Off) |
| 58 | Vibrato Mode, level 3 (C / V 3 Lit, CHORUS Off) |
| 79 | Chorus Mode, level 1 (C / V 1 and CHORUS On) |
| 100 | Chorus Mode, level 2 (C / V 2 and CHORUS On) |
| 122 | Chorus Mode, level 3 (C / V 3 and CHORUS On) |
The V5 also responds to MIDI control changes 0 through 127. These are mapped into the eight (8) (0 is the live mode) presets present in the V5 in a circular mode. For instance: a MIDI program change of 1 sets preset 1, a program change of 9 is preset 2, and a MIDI program change of 0 sets the live mode (see Using Presets and Live Mode section). The V5 will also send program changes 0 through 7. 0 denotes live mode
Here is the the request sysx dump message for the Voce V5:
0F0H, 0, 0, 31H, 43H, 0, 0H, 0F7H (H is hexadecimal)